Parmesan-Panko Crusted Halibut

Parmesan-Panko Crusted Halibut

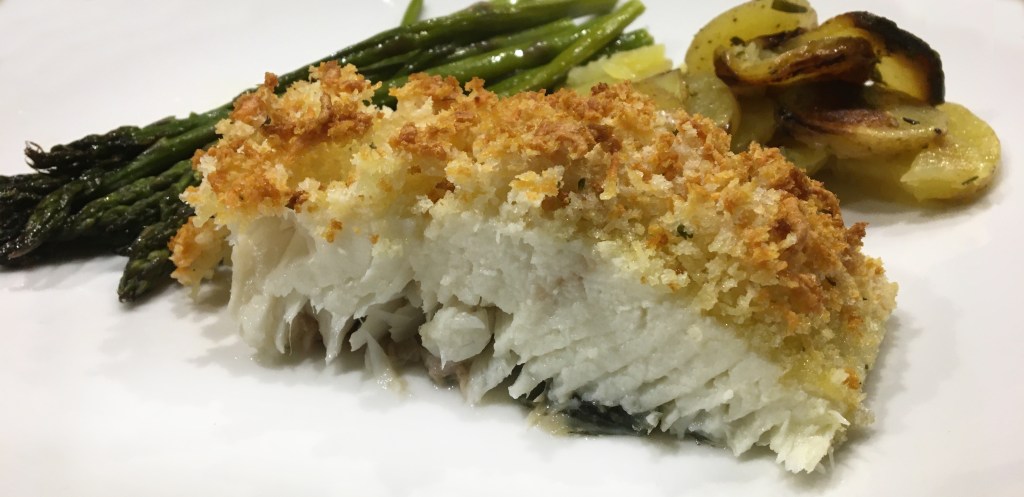
I loved this. I got a large piece of Halibut, about a pound and a half and served 4 of us. Roasted potatoes and asparagus as sides. Adjust the panko and parmesan to suit the size of fish. Adapted from the Loveofcooking.com blog.

Ingredients

  • 1-2 halibut fillets, skin removed
  • 1 tbsp olive oil divided
  • Juice from 1/2 lemon
  • Sea salt and freshly cracked pepper to taste
  • 1/2 – 1 cup plain panko crumbs
  • 1/2 cup of Parmesan cheese
  • 1 tbsp fresh parsley chopped
  • Cooking spray

Instructions

  • Drizzle the olive oil and lemon juice over both sides of the fish then season both sides with sea salt and freshly cracked pepper, to taste.
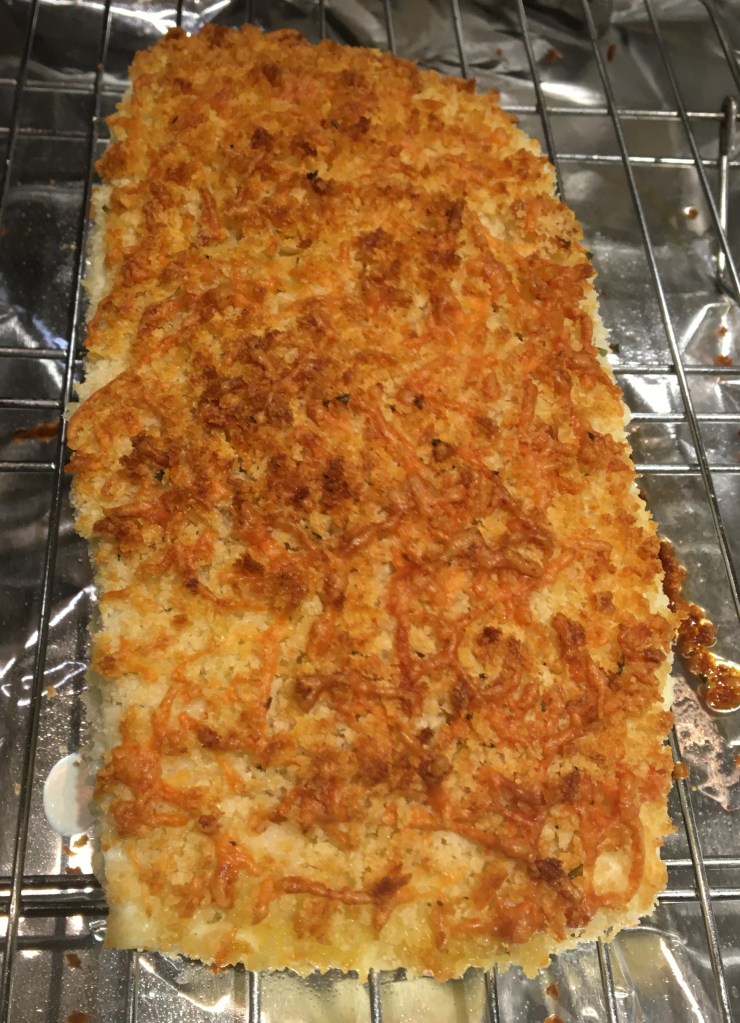
  • Line a baking sheet with tin foil. Place a cooling rack on the baking sheet. Coat with cooking spray. Side Note: Cooking the fish on the rack will allow the fish to be crispy on both sides without flipping it over while cooking.
  • Combine the panko crumbs, Parmesan cheese, fresh parsley, sea salt, and freshly cracked pepper, to taste together on a plate. Dip the halibut in the panko mixture until evenly coated. Place the coated fish on top of the cooking rack.
  • Place the baking sheet into the refrigerator for 20-30 minutes. Side Note: This step will ensure the panko coating will stay on the fish.
  • Preheat the oven to 450 degrees. Spray the top of each piece of fish with olive oil cooking spray. Place the baking sheet with the fish into the oven and cook for 15 minutes (depending on size and thickness) or until the fish is cooked through and flaky. Remove from the oven and serve with a lemon wedge. Enjoy.
Overnight Yeast Pancakes

Overnight Yeast Pancakes

When I was a kid my dad liked to make pancakes. Both my parents were great cooks. Mom was a very good teacher, dad not so much… I can remember her having to kind of nudge him into letting me make pancakes on my own. He would have loved these I am sure. These would be great on a morning when you have a lot of other things coming together and you can just pull these out of the fridge and heat up the griddle. The yeast gives them a special flavor. This recipe makes a LOT but you can freeze them! Serve with maple syrup, jam or fruit compote.

Ingredients

  • 1 package (1/4 ounce) active dry yeast
  • 1/4 cup warm water (110° to 115°)
  • 4 cups all-purpose flour
  • 1 tablespoon baking powder
  • 2 teaspoons baking soda
  • 2 teaspoons sugar
  • 1 teaspoon salt
  • 6 large eggs, room temperature
  • 4 cups buttermilk
  • 1/4 cup canola oil

Directions

  • 1. Dissolve yeast in warm water; let stand for 5 minutes. Meanwhile, in another bowl, combine the next 5 ingredients. Whisk eggs, buttermilk and oil; stir into flour mixture just until moistened. Stir in yeast mixture. Refrigerate, covered, for 8 hours or overnight.
  • 2. To make pancakes, lightly grease griddle and preheat over medium heat. Pour batter by 1/4 cupfuls onto griddle; cook until bubbles on top begin to pop and bottoms are golden brown. Turn; cook until second side is golden brown.
Strawberry Buttermilk Cake

Strawberry Buttermilk Cake

This cake is moist and lovely for dessert, brunch or tea time, Would be good with blueberries or raspberries. We could not wait for it to cool so ate it warm and it was just addictive. Adapted from theviewfromgreatisland.com

Ingredients

  • 1 and 1/2 cups or 210 grams all purpose flour
  • 1 tsp baking powder
  • 1/4 tsp salt
  • 1/2 cup (1 stick or 113 grams) unsalted butter, at room temperature
  • 3/4 cup or 225 grams granulated sugar plus extra for sprinkling
  • 1 1/2 tsp vanilla extract
  • 3 large eggs or 2 jumbo eggs
  • 1/4 cup or 60 grams sour cream
  • 1/4 cup or 60 grams buttermilk
  • 14 ounces or 398 grams fresh strawberries hulled and sliced

Instructions

  • Set oven to 350F
  • Lightly spray a 9 or 10 inch spring form pan.
  • Whisk together the flour, baking powder, and salt and set aside.
  • Cream the soft butter and sugar together in a stand mixer for 3-4 minutes, until light and fluffy. Scrape down the side of the bowl a couple of times.
  • Beat in the eggs, one at a time, and then beat in the vanilla.
  • Stir the sour cream and buttermilk together to blend, and then add the flour to the mixing bowl alternately with the sourcream/milk, beginning and ending with the flour. Mix until combined, but don’t over mix.
  • Fold in the berries and turn into the prepared pan. Smooth out the top. Sprinkle the surface of the cake liberally with granulated sugar.
  • Bake for 40-45 minutes, or until the cake no longer jiggles in the center and the top is golden and slightly crackled. The exact cooking time will depend on the pan size you use. You can insert a toothpick in the center to test.
  • Let cool briefly, and then unlatch the spring and remove the outer ring. I like to run a spreading knife along the edge first to loosen any parts of the cake that are sticking to the pan. Cool completely on a rack before slicing.

Rosemary Brioche Rolls

Rosemary Brioche Rolls

These are WONDERFUL. The dough is very soft and handling can be a bit tricky but I found this to be an easy recipe. The next time I make these (and there will be a next time) I might add a bit more rosemary. Adapted from Countryliving.com.

INGREDIENTS

1 tbsp. active dry yeast
3 1/2 c. all-purpose flour
1/4 c. sugar
1 tsp. salt
5 large eggs
1 stick unsalted butter
1 tbsp. fresh rosemary
1 tbsp. Freshly ground pepper
2 tbsp. Sea Salt

DIRECTIONS

  1. In a small bowl, whisk together the yeast and 1/2 cup lukewarm (90-degree to 110-degree F) water. Let it sit until the yeast becomes active and bubbly, about 10 minutes.
  2. Combine the flour, sugar, and salt in the bowl of a stand mixer (or in a large bowl). Add the yeast mixture and stir well to combine. Add 4 eggs, one at a time, mixing well with each addition. Add the butter, rosemary, and pepper, and stir until just combined.
  3. Transfer the dough to a lightly floured surface and knead with the heels of your hands until a smooth, soft dough comes together. Place the dough in a large, lightly greased bowl and cover loosely with plastic wrap or a kitchen towel. Set it in a warm place to rise until the dough is doubled in size, about 1 hour.
  4. Prepare a baking pan by lining it with parchment; set aside. Divide the dough into 12 equal pieces. Roll each piece into a ball and place it on the prepared pan, spacing the rolls out equally. Loosely cover the rolls and let them rise until doubled in size, 30 to 45 minutes.
  5. Preheat the oven to 375 degrees F. Meanwhile, whisk the remaining egg with 1 tablespoon of water and brush the tops of the rolls with egg wash. Sprinkle the rolls with sea salt or kosher salt, and bake until they are a deep golden brown color, about 20 minutes. Cool on a wire rack.

Peanut Butter Pie

Peanut Butter Pie

I have been baking. A lot. My husband had mentioned that his mom had tried to make a peanut butter pie once and it did not turn out quite right but that it tasted good so I made a mental note. He had one of THOSE days yesterday so I whipped this up because, you know, pie makes everything better. It is meant to be served cold but he could not wait and I have to admit it was really good warm out of the oven. I got the idea looking at different recipes and loosely followed a James McNair recipe. This has a very cheese cake type of texture. His recipe called for it not to be baked but I think this was an old recipe before raw eggs was a bad thing.

Ingredients

Crust

Use a food processor to make fast work of the cookie crumbs. Figure 8 ounces of cookies equals 2 cups.

2 Cups fine cookie crumbs, Chocolate Graham crackers
8 tablespoons butter, melted

Preheat oven to 350. in a medium sized bowl combine cookie crumbs and butter. Spread into a buttered 9 inch pie pan. Press crumbs to pack evenly on the sides and bottom of pan.

Bake for 10 minutes to set crumbs. Set aside to cool

Filling

Cookie crumb crust
8 ounces cream cheese, at room temperature
3/4 Cup smooth peanut butter
6 tablespoons butter, room temperature
2 egg yolks
1 can (14 oz) sweetened condensed milk
1 teaspoon Vanilla extract

Directions

Prepare crust and cool.

Combine cream cheese, peanut butter, butter and egg yolks in large bowl and beat until fluffy. Drizzle in condensed milk and beat until smooth. Stir in vanilla. Pour into the pie shell.

Cook for about 20 minutes at 350 or until inserted knife comes out clean.

Refrigerate until well chilled. You could serve this with warm chocolate sauce if you want to go over the top.

Spring Fritatta

Spring Fritatta

This is perfect for a spring brunch! You can make any vegetable variation. I used an 11 inch skillet.

Ingredients

  • 6 large eggs, use 8 eggs for a 12-inch skillet
  • ¼ cup milk (or soy, rice, almond)
  • ¼ teaspoon sea salt, more for sprinkling
  • Freshly ground black pepper
  • 2 cups chopped broccoli or broccolini
  • 1 package sliced mushrooms
  • 1/2 C cheddar cheese

Directions

Preheat oven to 400.

Whisk eggs, milk and salt, set aside.

Heat 1 tablespoon olive oil in a 10 or 12-inch cast-iron skillet over medium heat.

Add the broccoli, and a pinch of salt and pepper and cook, stirring occasionally, until the broccoli is tender but still bright green, 5 to 8 minutes.

Stir in the mushrooms and cook until tender.

Add the egg mixture and gently shake the pan to distribute. Sprinkle with the cheese and bake 15 to 20 minutes or until the eggs are set. Season to taste and serve.

Chocolate Peanut Butter Frosting

Chocolate Peanut Butter Frosting

I made this as a frosting on a devils food cake but this would be wonderful on cupcakes. Those kind of cupcakes that are the size of your head and with a huge swirl of frosting. I have never been a huge cake fan and even less of frosting. But, full disclosure, I wanted to sit down with a spoon and eat this right out of the bowl. I had to throw out the left overs so I would not be tempted. My husband ate 2 pieces of this cake and I am convinced it was because of the frosting. From Sallysbakingaddiction.com

Ingredients

  • 1 cup (230g) unsalted butter, softened to room temperature
  • 1/2 cup (130g) creamy peanut butter*
  • 3 and 1/2 cups (420g) confectioners’ sugar
  • 1/2 cup (45g) unsweetened natural or dutch-process cocoa powder
  • 1 teaspoon pure vanilla extract
  • 1–2 Tablespoons milk
  • salt, to taste

Directions

With a handheld or stand mixer fitted with a paddle or whisk attachment, beat the butter and peanut butter together on medium speed until creamy and smooth, about 2 minutes. Add confectioners’ sugar, cocoa powder, vanilla extract, and 1 Tablespoon milk. Mix on low speed for 30 seconds, then increase to high speed and beat for 2 minutes. Add another Tablespoon or 2 of milk if frosting is too thick. Taste and add a pinch of salt if needed. (I always add a pinch!)

Asparagus and Mushroom Pappardelle

Asparagus and Mushroom Pappardelle

Spring makes me think of fresh asparagus. I love it. Also my mom suffers from reflux so I am always on the lookout for pasta that does NOT contain tomatoes. I made the pasta for this but store bought is fine. You could also substitute zucchini or spinach in this recipe. This recipe was adapted from Delish.com. I served this with home made Rosemary Brioche Rolls. This makes about 5-6 servings.

INGREDIENTS

kosher salt

1 lb. pappardelle

3 tbsp. extra-virgin olive oil

1 lb. baby bella mushrooms or white, sliced into 1/4″ pieces

Freshly ground black pepper

1 c. vegetable stock

1 lb. asparagus, chopped into 1″ pieces

2 tbsp. butter

1 c. freshly grated Parmesan, plus more for garnish

1 c. freshly grated fontina cheese

1/2 c. fresh herbs

DIRECTIONS

  1. Bring an 8-quart stock pot of water to a boil and generously season with salt. Cook pasta according to package directions until al dente. Drain, reserving 1 cup pasta water, and return to pot.
  2. Meanwhile, in a large skillet over medium-high heat, heat oil. Add mushrooms and spread in an even layer; cook for 3 minutes before stirring to let the mushrooms brown. Add garlic, season with salt and pepper, and cook 2 minutes more. Add stock and asparagus, then using a wooden spoon, scrape bottom of pan to remove the browned garlic and mushrooms. Bring to a boil and simmer for 5 minutes. Add butter, pasta, and both cheeses, then gently mix with tongs. (If the pasta seems dry, slowly add reserved pasta water until desired consistency is reached.)
  3. Serve in skillet or transfer pasta to a platter and top with grated Parmesan, a drizzle of olive oil and parsley. Serve immediately.
Hot Cross Buns

Hot Cross Buns

I have been searching for the last couple of years for a recipe that recreates the hot cross buns I grew up with in New England. These are as close as I have ever come. They recall the Good Fridays of my childhood and the wonderful bakeries we had. I was going to make the white cross glaze but both grocery stores were out of confectioner’s sugar so I followed the recipe. These are always best out of the oven but they can be toasted or microwaved to warm up. It looks like a lot of steps but it really was easy. From www.recipetineats.com

Ingredients

BUNS:

  • 3 teaspoons instant or rapid rise yeast (9 grams), Note 1, CHECK still active!
  • 1/2 cup (110g) caster sugar (superfine sugar)
  • 1 1/2 cups (375ml) milk, warm , full fat or low fat (Note 2)
  • 4 1/4 cups (640g) bread flour (or plain / all purpose) (Note 3)
  • 2 tsp cinnamon powder
  • 2 tsp All Spice OR Mixed Spice (Note 4)
  • 1/2 tsp salt
  • 1 1/2 cups (210g) sultanas (Note 4)
  • 1 – 2 oranges, zest only (Note 4)
  • 50g / 3.5 tbsp  unsalted butter, melted and cooled
  • 1 egg , at room temperature

EXTRA FLOUR FOR DOUGH

  • 1/4 cup (35g) Extra bread flour

CROSSES:

  • 1/2 cup (75g) flour (any white flour)
  • 5 tbsp water

GLAZE:

  • 1 tbsp apricot jam (Note 7)
  • 2 tsp water

Instructions

  • Place flour, yeast, sugar, all spice, cinnamon, and salt in a large bowl. Briefly mix with stand mixer fitted with a dough hook.
  • Add butter, milk, egg, sultanas and zest.
  • Standmixer: Mix until a smooth elastic dough forms – 5 minutes on Speed 2 of standmixer. After 1 minute, add extra flour if required, just enough so dough comes away from side of bowl when mixing and doesn’t stick terribly to your fingers. (Note 5).
  • Hand kneading: Alternatively, dust a work surface with flour and knead by hand for 10 minutes.
  • Dough is kneaded enough when it’s smooth and does not break when stretched – see photos video for before/after comparison.

RISE #1:

  • Leave dough in the bowl, cover with cling wrap and place in a warm, wind free place to rise until doubled in size. This will take anywhere between 30 minutes to 1 1/2 hours depending on how warm it is – see Note 6.

FORMING BALLS:

  • Line a 31.5 x 23.5 cm / 9 x 13″ tray with baking paper with overhang.
  • Remove cling wrap and punch dough to deflate.
  • Dust work surface with flour, place dough on work surface, shape into a log – this will deflate the air. Cut into 12 equal pieces.
  • Take one piece and press down with palm, then use your fingers to gather into a ball, then roll the dough briefly to form a ball. This stretches the dough on one side and that’s how I get a nice smooth surface.
  • Place the ball with the smooth side up on the tray. Repeat with remaining dough. Line them up 3 x 4.

RISE # 2:

  • Spray a piece of cling wrap lightly with oil (any), then loosely place over the tray.
  • Return tray to warm place and leaver 30 – 45 minutes, until the dough has risen by about 75% (less than double in size).
  • Partway through Rise #2, preheat oven to 180°C/350°F (all oven types).

CROSSES:

  • Mix flour and water until a thick runny paste forms – see video for thickness required.
  • Spoon into a round 3 mm piping bag or small ziplock bag then snip corner.
  • Remove the cling wrap and pipe crosses onto the buns. Go slow so it hugs the curves.

BAKING/GLAZE:

  • Bake for 22 minutes, or until the surface is a deep golden brown. The surface colour is the best test for this recipe.
  • Meanwhile, place jam and water in a bowl, microwave for 30 seconds. Mix to combine.
  • Remove buns from oven. Use overhang to lift buns onto a cooling rack.
  • Brush with jam mixture while warm. Allow to cool to warm before serving.

Notes

1.  Yeast: Use any yeast labelled instant or rapid rise yeast. I use Lowan Dried Instant Yeast (red tube, sold at Woolies/Coles baking aisle). YEAST CHECK to ensure your yeast is still active (unless you just bought/opened a fresh bottle): mix 1 teaspoon yeast with 1/2 tsp white sugar and 1/4 cup warm water (40C / 100-110F). Leave 10 minutes. Foamy and creamy, smells yeasty = yeast is good. If no foam, it’s dead. Time to get another!Normal yeast / active dry yeast – same ingredients, but start as follows:

  • mix yeast, 2 teaspoons of the sugar and all the warm milk in the bowl, then leave 5 – 10 minutes until surface gets foamy;
  • add all the other ingredients (including remaining sugar minus the 2 tsp used above), then mix/knead per recipe; and
  • proceed with recipe as written.

Fresh yeast (comes in a block that crumbles, not powder like dry yeast) – use 27g/ 0.9 oz. Crumble it into the milk and let stand until it foams up, same as using active dry yeast per above.2. Milk warmth – Scalding hot milk kills the yeast. I heat it for 45 seconds on high in the microwave. The test is this: stick your finger in. If it was a bath, would it be pleasant? Good. It’s not too hot or too cold!3. Breads are also fluffier and more tender if made with bread flour rather than normal flour. However, this recipe works great with normal white flour too.Flour quantity – differs all year round, and with different flour brands. Start with 4 1/4 cups to be safe (better to start sticky and add more flour as required), expect to add an extra 1/4 cup. DO NOT add too much flour – results in dry dough = tough buns.4. Flavourings

  • Spices – All Spice is my default, but I also use Mixed Spice too and no one would ever know the difference. Sub with: 1 tsp cinnamon, 1/2 tsp each cloves and nutmeg
  • Sultanas: Some recipes say to add sultanas after the dough has been kneaded or risen. If you do this, you’ll find it very hard to disperse them evenly throughout the dough. By adding them before kneading, some do get squished. But it’s not noticeable in the end result.
  • Orange – use 2 oranges if you want a more prominent orange flavour, or switch for 1/2 cup candied citrus peel.
  • Choc chips! Use 2 cups instead of the sultanas (any more and you end up with quite a gooey melted chocolate centre!)

5. Dough: Takes ~5 min, speed 2 with KitchenAide. Add the extra flour if required so the dough comes away from the bowl – the trick is to use the minimum to keep the dough soft so it rises easily (= fluffy buns), but just enough so the dough doesn’t massively stick to your fingers (should be bit sticky though). Tough dough from too much flour = tough buns!6. WARM PLACE for dough: This is what I do all year round – use my dryer. Laugh – but try it! Run the (empty) dryer for 1 – 2 minutes, then place the bowl inside. If you do that, the dough will rise in 40 minutes. Even if it’s snowing outside!7. Jam – sub with any jam to get the glossy finish. Apricot is best because it’s clear(ish). Red jams will have more colour. OR sub with honey or golden syrup (follow same amount and directions). Maple syrup – skip the water.8. STORING / MAKE AHEAD:

  • Make today, bake tomorrow – Do Rise #1 then follow steps to form the balls per the recipe and place in tray, ready to do Rise #2. Except put it in the fridge instead. Leave overnight. Then remove from fridge and put it in a very warm place. Once the fridge chill is gone and the dough is back at room temperature, it will then start the Rise #2 as per the recipe. It takes 2.5 – 3.5 hrs to finish Rise #2 after taking it out of the fridge. Then bake per recipe! (Bonus: They are even tastier if you make ahead because the dough develops flavour overnight!)
  • Best served on day it’s baked: As with all homemade bread, it is best served on the day it’s baked. Stays fresher and softer if you use bread flour.
  • For the day after, reheating makes all the difference to make them soft and moist again – 15 sec in the microwave! These freeze great, then just defrost. To reheat batches, I pop them on a tray and cover with foil (to avoid the surface getting too crisp), then reheat at 160C/320F for 8 minutes or so.

Sheet Pan Chicken Nachos

These really need no explanation. Super quick for a week night. We made this the meal as it was so filling we did not need the main dish!

INGREDIENTS
  • 1 (15-ounce) can black beans (I used half a can)
  • 1 (2.25-ounce) can sliced black olives
  • 12 ounces sharp cheddar or Monterey jack cheese, or a combination (2 cups shredded or more)
  • 1 small jalapeño (optional)
  • 1 pound rotisserie chicken meat (from a 4 to 5-pound chicken) or cooked shredded chicken
  • 1 cup salsa (I used a combo of Chunky and Peach Salsa)
  • 1 (16-ounce) bag restaurant-style tortilla chips (I used Blue Corn)
  • Guacamole for topping

INSTRUCTIONS

  1. Arrange a rack in the middle of the oven and heat the oven to 425°F.
  2. Prepare the following, keeping them separate: Drain and rinse 1 can black beans. Drain 1 can sliced black olives. Thinly slice 1 small jalapeño, if using.
  3. Shred 1 pound cooked chicken into a medium bowl. Add 1/2 cup salsa and toss to combine, use the remaining to add where needed.
  4. Build the nachos: arrange about half of a 16-ounce bag of tortilla chips on the baking sheet in an even layer. Top with half of the seasoned chicken and a handful of shredded cheese and some of the beans. Layer the remaining chips on top, followed by the remaining chicken, beans and cheese as the last layer.