Blueberry Peach Crumble

Blueberry Peach Crumble

Peaches and blueberries are a favorite combination in our house. Thanks to my sister in law (and Harry and David)! This was a perfect Sunday afternoon treat (this would be good for breakfast, too). Adapted from pastryandbeyond.

Ingredients

Crust and Crumbles

  • 1 cup all-purpose flour
  • 1 cup and 1/3 cup rolled oats
  • 1/2 cup granulated sugar
  • 1 teaspoon cinnamon
  • 1/4 teaspoon salt
  • ⅔ cup unsalted butter, melted and cooled

Peach Filling

  • 1 cup peaches, peeled and cut into small pieces
  • 1 cup blueberries
  • 1-2 tablespoons granulated sugar
  • 2 teaspoons cornstarch 
  • 1 teaspoon fresh lemon juice
  • 1 teaspoon almond extract

Instructions

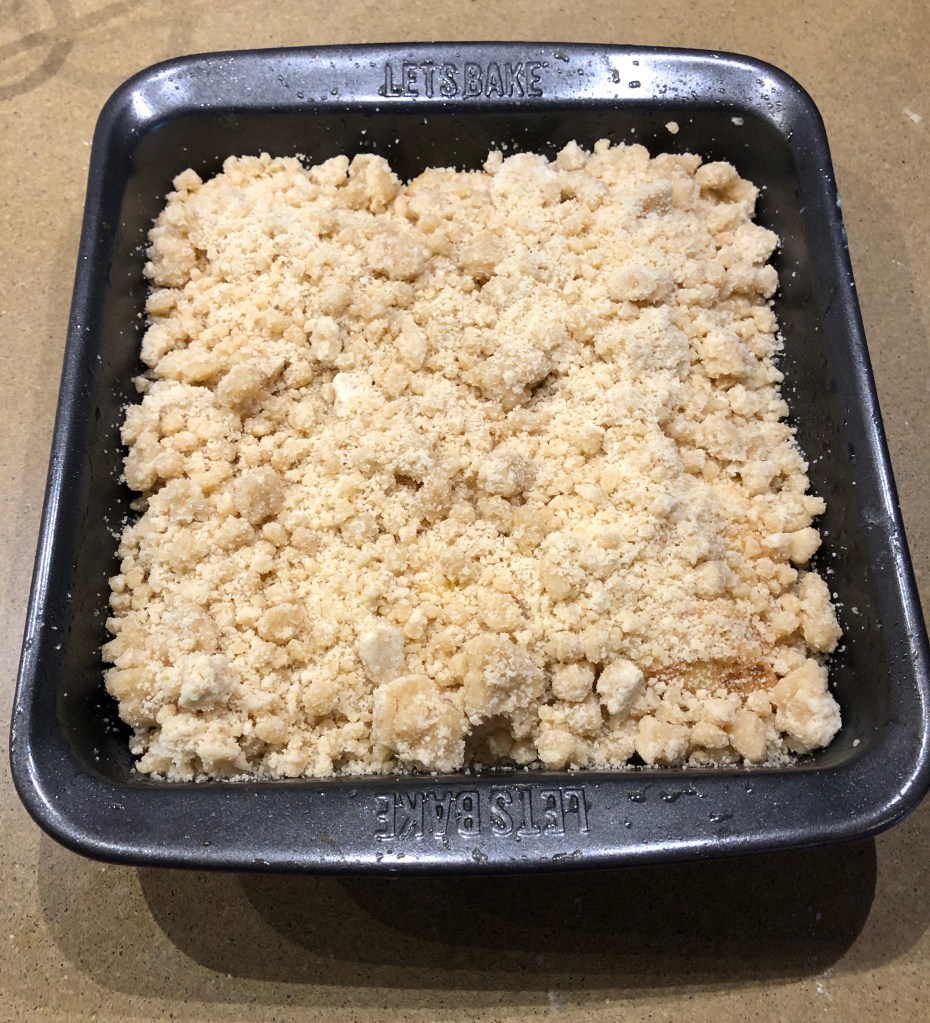
  • Preheat the oven to 350°F. Grease 8 inch square oven-proof dish and line the bottom and sides with parchment paper, about 2 inches of overhang on each side.
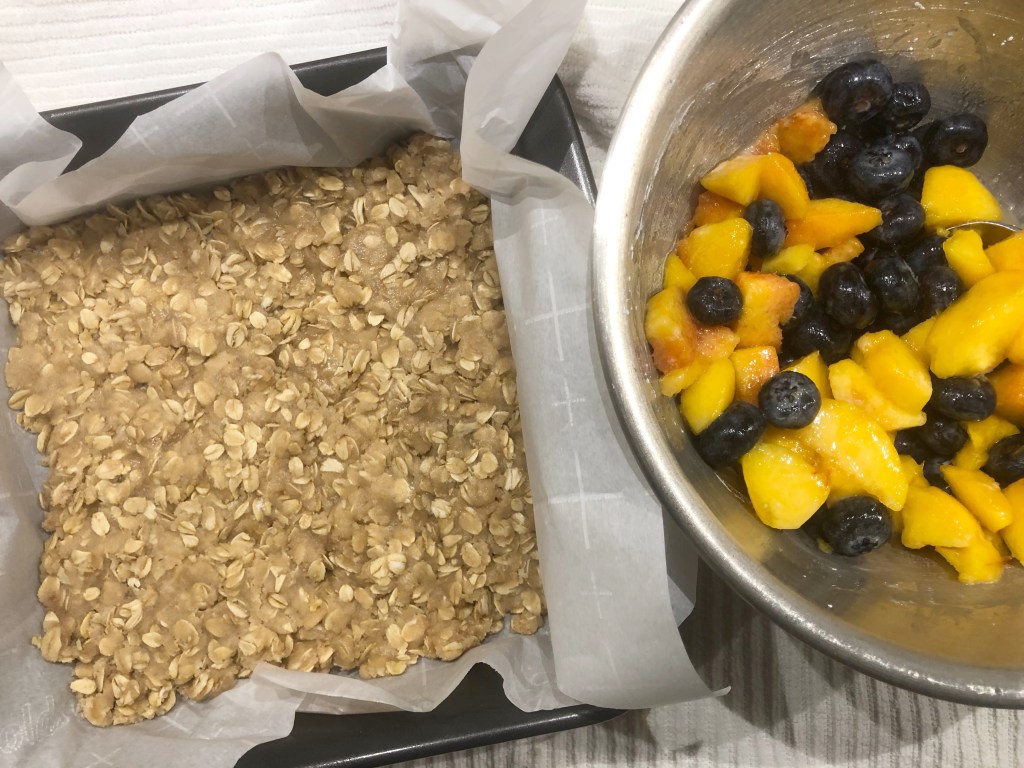
  • Mix the peaches and blueberries with lemon juice and then with the almond extract. Next, toss with cornstarch and sugar. Set aside.  
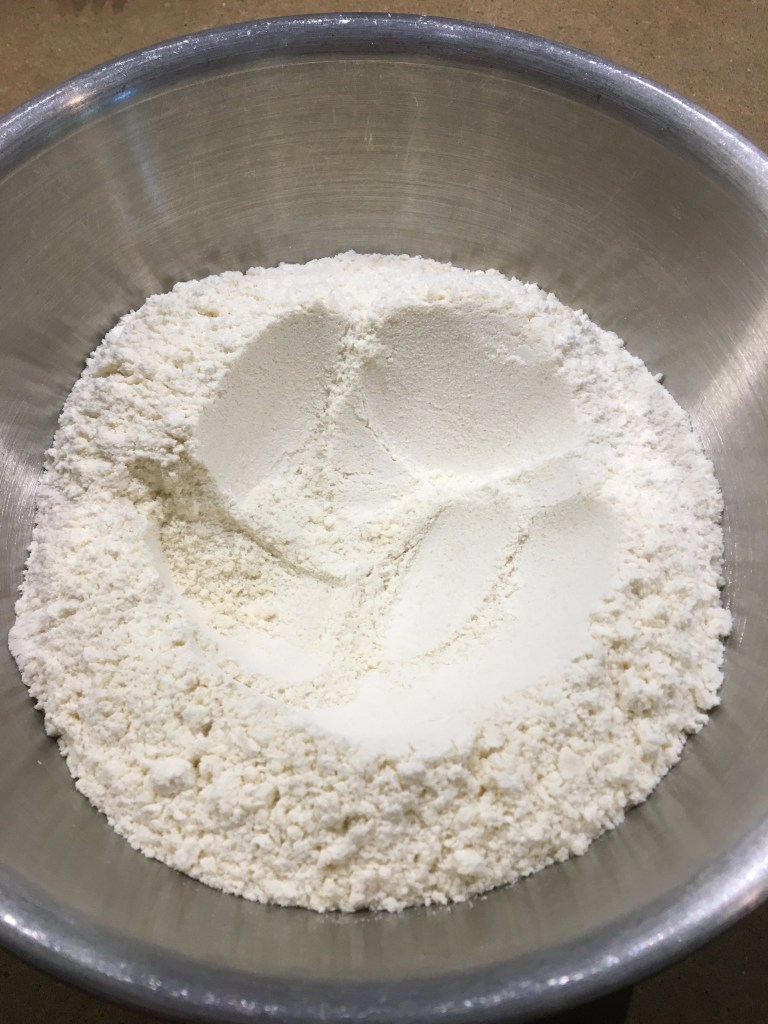
  • Mix the flour, rolled oats, sugar, cinnamon, salt well in a medium bowl. Then add the melted butter and stir with a spoon or spatula.
  • Place ⅔ of the mixture into an oven-proof dish that is lined with parchment paper.  Use your hands or a spoon to spread the mixture evenly.
  • Next, cover the crust with the peach mixture but leave the excess liquid in the bowl. You may want to use this liquid later if there is too much left. (You can place that liquid into a small pan, and when the mixture thickens you can remove it from the heat and drizzle the sauce on top of the baked bars. ) 
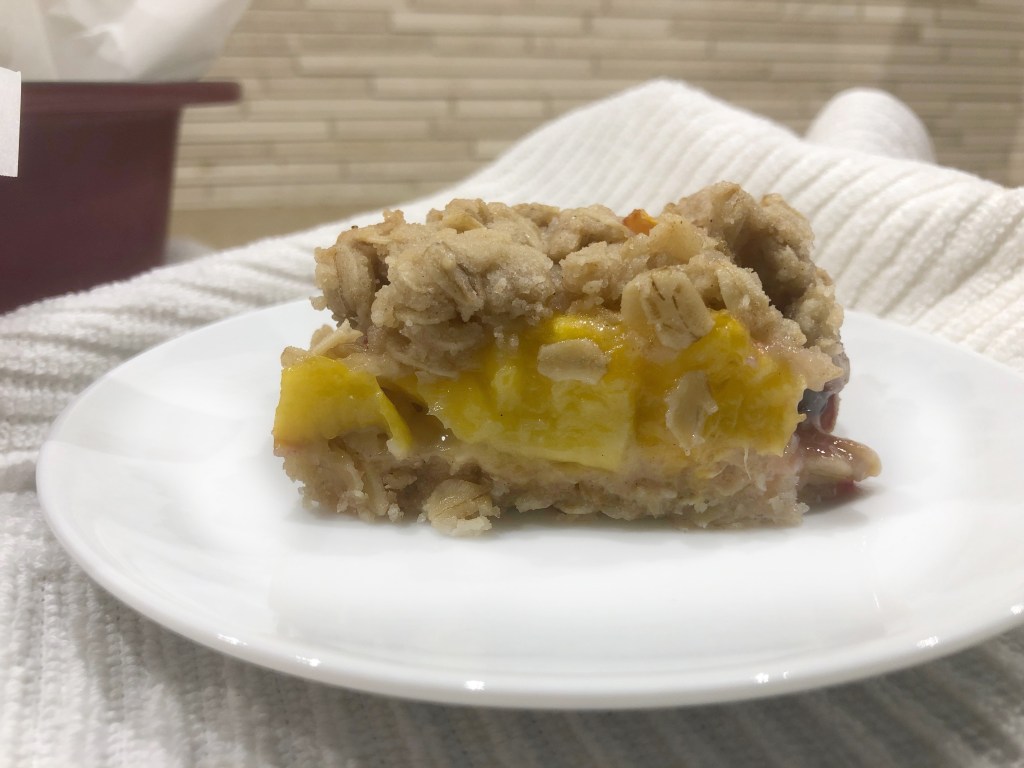
  • Sprinkle the remaining dough over the peaches. If you like you can make some big crumble pieces by squeezing crumble mixture in your hand before sprinkling. Use your fingertips to press to the crumbles so they can stick to peaches. 
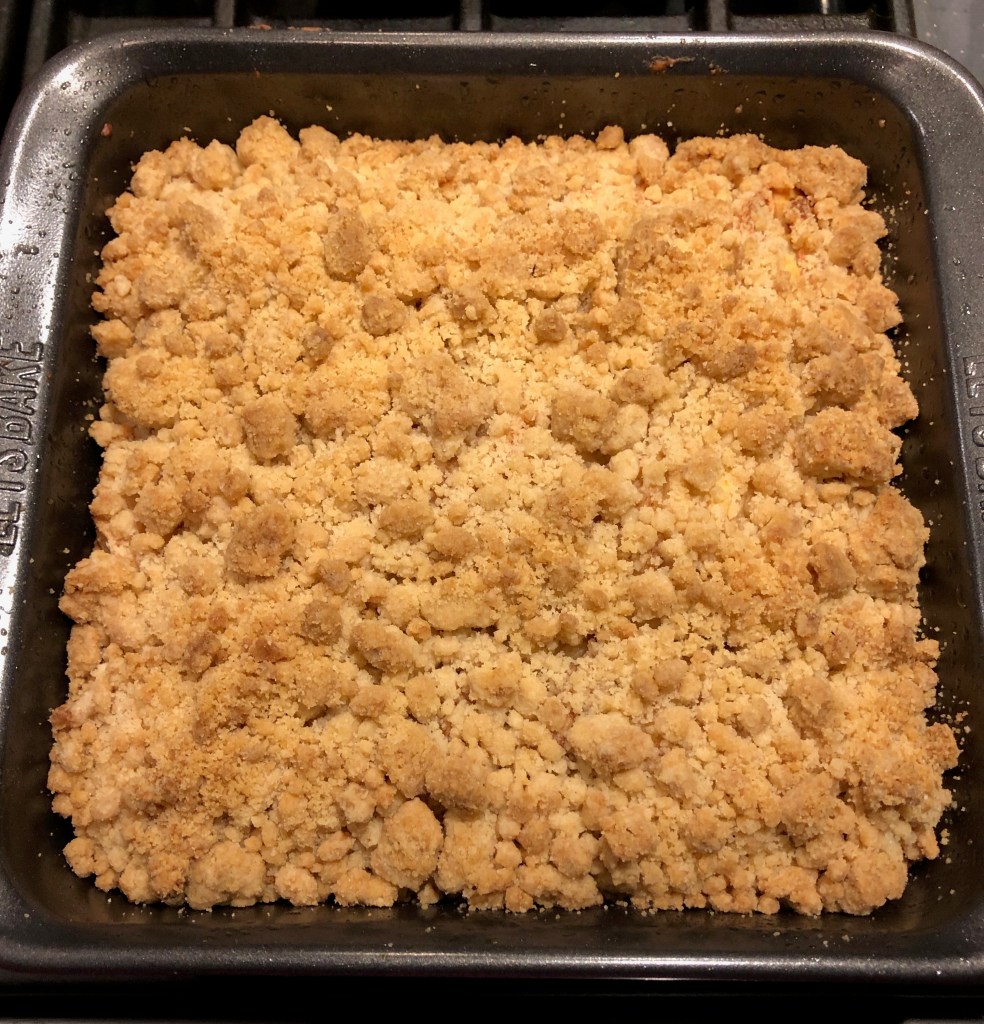
  • Bake for 33-35 minutes until the top becomes golden brown and the crumbles are crunchy. Let it cool at room temperature for almost 1 hour. Then keep in the fridge for extra 1,5 hours until it is completely cool so you can have nicely cut bars.

Advertisement
Labneh

Labneh

This is my new favorite thing. I had never had it before but was inspired after my friend Vivi told me it was one or HER favorite things. Oh my! SO. GOOD. Labneh is a soft Middle Eastern cheese made from strained yogurt. It’s surprisingly easy to make, and it’s really versatile. Serve it as a dip with good-quality olive oil and za’atar. This recipe is from loveandlemons. I served with homemade pita but it would be great with crackers, veggies, on pizza….

Ingredients

  • 1 cup whole milk Greek yogurt
  • heaping 1/4 teaspoon sea salt

Instructions

  • In a small bowl, mix together the yogurt and salt.
  • Scoop the mixture onto a layer of cheesecloth (or 2 layers, depending on the thickness of your yogurt). Bring the edges of the cheesecloth together, tie it around a wooden spoon, and place the spoon across the top of a medium bowl so that the labneh hangs in the center but does not touch the bottom of the bowl. Chill overnight.
  • Remove the labneh from the cheese cloth. Transfer to bowl and serve as a spread with desired toppings and veggies, pita, or crackers for dipping. It can also be dolloped, like soft goat cheese, onto salads, pizza, or flatbread.

toppings & serving options

  • Olive oil for drizzling
  • Z’atar spice mix (I found at Trader Joe’s)
Brazilian Cheese Bread

Brazilian Cheese Bread

These are quick to make and addicting!!!! From the blog Simply Recipes. This is very similar to a popover in consistency. They are best served warm from the oven. I served them alongside Beef Bourguignon
on Christmas Eve.

Ingredients

  • 1 large egg
  • 1 large egg, room temperature
  • 1/3 cup extra virgin olive oil
  • 2/3 cup milk
  • 1 1/2 cups (170 grams) tapioca flour
  • 1/2 cup (packed, about 66 grams) grated cheese, your preference (see recipe note)
  • 1 teaspoon salt (or more to taste)

Instructions

  1. Pour into mini-muffin tin: Pour batter into prepared mini-muffin tin, not quite to the top; leave about 1/8 inch from the top.
  2. Bake: Bake at 400°F in the oven for 15-20 minutes, until all puffy and nicely browned. Remove from oven and let cool on a rack for a few minutes.
  3. Pour into mini-muffin tin: Pour batter into prepared mini-muffin tin, not quite to the top; leave about 1/8 inch from the top.
  4. Bake: Bake at 400°F in the oven for 15-20 minutes, until all puffy and nicely browned. Remove from oven and let cool on a rack for a few minutes

Eat while warm!

Note that Brazilian cheese bread is very chewy, a lot like Japanese mochi.

Bonus Recipe

1 kg tapioca flour [polvilho azedo]
1 kg potato, cooked in water and mashed
250 ml milk at room temperature
250 ml vegetable oil
1 tablespoon salt
1/2 queso fresco or panela grated [1 pound]
6 free range eggs

Put the tapioca flour in a bowl. Add the potato still hot using a potato masher. Add salt. Mix very well using your hands. Add milk and continue working the dough with your hands. Add vegetable oil. Continue working. Add the grated cheese, and at last the eggs. Add 1 teaspoon of anise seeds for a special touch. The dough needs to get very silky and be moldable. If it is breaking, add one more egg. Make little round breads, and bake at 450oF for 20 minutes. The dough can be frozen.

Pear Gallete

Pear Gallete

This was a wonderful dessert for my Christmas Eve party. This was adapted from a recipe from Bluebowlrecipies.com. I am not overly fond of super sweet desserts so I left off the salted caramel sauce but if you want the full recipe visit the site.

Prep Time 25 minutes  Cook Time 30 minutes   Dough Chill Time 45 minutes   Servings 8 slices

INGREDIENTS

For the Crust

1 1/4 cup all-purpose flour

1 TBSP granulated or cane sugar

8 TBSP salted butter, cold, cut into chunks

3/4 tsp salt

3-5 TBSP cold water

1/4 cup full-fat sour cream

For the Pear Filling

4 medium pears, thinly sliced

1/4 cup sugar

1/2 tsp vanilla

1 tsp cinnamon

1/4 tsp nutmeg

1/4 tsp ground cloves

1/4 tsp salt

INSTRUCTIONS

Make the galette crust: In a medium/large mixing bowl, whisk together the flour, salt, and sugar. Cut the cold butter into chunks and add to the bowl. Cut in the butter using a pastry cutter, until the pieces of butter are pea-sized. Add the cold water and the sour cream, and start gently mixing it into the dough with a fork. Once the mixture starts to resemble a dough, use your hands to gently work it into a ball. Flatten the ball slightly into a thick disc of dough, wrap tightly in plastic wrap, and chill in the fridge for 45 minutes. 

Make the filling: While the dough chills, gently stir together all the filling ingredients in a medium bowl.

Roll the crust: Preheat the oven to 400 degrees. Get out a large round pizza pan or a large cookie sheet and line with parchment paper. 

Flour the counter and the rolling pin and remove the dough from the fridge. Take off the plastic wrap. Begin rolling out the dough, gently, turning continuously so it doesn’t stick to the counter. Be patient and gently here – we’re not trying to stretch the dough all the way out in a few passes of the rolling pin! That leads to tougher dough, and cracking of the dough. 

Once the dough is about 12-14 inches in diameter, gently roll it onto the rolling pin and transfer it onto the prepared baking sheet. (See note)

Assemble: Lay the pears on the dough, leaving 2 inches around the outer edge. I made three circles, starting with the outside edge and working my way to the center.  Fold the edges of the crust up over the filling, working in small sections. This is a rustic dessert – it doesn’t have to look perfect!

Bake: Beat an egg in a small dish and add a splash of milk. Brush it over the pie crust and then sprinkle the crust with coarse/raw sugar. Bake for 30-35 minutes, or until crust is golden brown and sounds solid/crisp when tapped (it shouldn’t be soft).

Big Apple Crumb Cake

Big Apple Crumb Cake

This is wonderful!!!! Adapted from the Smitten Kitchen- one of my favorite blogs. I cut down on the amount of sugar and left off the powdered sugar because I don’t like overly sweet desserts. I used honeycrisp and golden delicious and substituted Greek yogurt for sour cream. I did not use all the crumb either but was a personal call. This was wonderful the next day, I just warmed a little in the oven. I made this for my mom’s birthday and she LOVED it.

Apples

  • 1 pound apples (3 medium or 2 large), peeled if you wish, cored, cut into 1/2-inch wedges
  • Juice of half a lemon
  • 1 teaspoon ground cinnamon
  • 1 tablespoon granulated sugar

Crumbs

  • 1/2 cup unsalted butter, melted
  • 1/3 cup light or dark brown sugar
  • 1/4 cup granulated sugar
  • 1 teaspoon ground cinnamon
  • 1/4 teaspoon kosher salt
  • 1 1/3 cups all-purpose flour

Cake

  • 6 tablespoons unsalted butter, softened
  • 1/4 cup granulated sugar
  • 1 large egg
  • 1/3 cup sour cream or greek yogurt
  • 1 teaspoon vanilla extract
  • 1 cup all-purpose flour
  • 1 1/4 teaspoon baking powder
  • 3/4 teaspoon kosher salt

Heat oven: To 325°F (165°C). Lightly coat an 8-inch square or 9-inch cake pan with butter or nonstick spray. For extra security, line it with parchment paper.

Prepare apples: Toss apples with lemon juice, then cinnamon and sugar and set aside.

Make crumbs: Whisk butter, sugars, cinnamon, and salt together until evenly mixed. Add flour and mix until it disappears. It’s going to be very thick; set it it aside.

Make cake: Beat butter with sugar until lightened and fluffy. Add egg, sour cream, and vanilla and beat until combined. Sprinkle surface of batter with with baking powder and salt, and beat well to combine. Add flour and mix only until it disappears.

Assemble: Scrape batter into prepared cake pan and smooth it flat. Arrange apples on cake, slightly overlapped. I usually fit all but 2 wedges; those are cook’s snacks. Pour any cinnamon-apple juices in bottom of bowl over apples. Sprinkle crumbs over apple slices. For bigger crumbs, squeeze the crumbs into small fistfuls and break these up into a couple bigger chunks over the cake.

Bake: Bake the cake until a toothpick inserted into the apples doesn’t hit any crisp spots and if you look closely, you’ll see juices bubbling around some apples, about 50 to 55 minutes. 

Cool to room temperature, if you can bear it, before cutting into squares or wedges. Dust generously with powdered sugar.

Cake keeps at room temperature loosely covered (in an airtight container, the crumbs eventually soften) for 3 days or in the fridge, well-wrapped, for 6 days.

Goat Cheese and Chicken Enchiladas

Goat Cheese and Chicken Enchiladas

I am REALLY behind on food blogs. On a recent trip to Santa Fe I fell in love with the cuisine (again) and I picked up a Santa Fe Cooking School cookbook. I can’t wait to make some of the recipes. After adapting this recipe I made some home made corn tortillas (next blog) and I will be making this again! I made this batch with corn tortillas I bought from a Mexican market but home made is a game changer. I have a tortilla press on my Christmas list. I did not make my own green sauce but used a brand I found in the store so it made this a quick and wonderful meal, even on a weeknight. This can be made vegetarian by omitting the chicken.

Ingredients

6 corn tortillas
1 small package (4-6 oz) Goat cheese – depending on how cheesy you want
8 oz package of Mexican shredded cheese (Monterey Jack, Cheddar, asadero) or more
8 oz shredded chicken
1 Jar of green enchilada sauce
sliced avocado

Preheat oven to 350

In a mixing bowl, combine 3/4 of the goat cheese, chicken and 3/4 of the shredded cheeses.

Lightly grease a 9 x 13 inch pyrex dish. Pour half the jar of green enchilada sauce into the baking dish and spread evenly on bottom.

Preheat a skillet over medium-high heat. Place a corn tortilla in the pan and heat about one minute, Turn and heat for about another 30 seconds.

Fill the warm tortilla with the cheese mixture about half a cup down the middle. Roll up the tortilla and place seam side down in the baking dish. Repeat with the remaining tortillas. Cover with the remaining green sauce. Sprinkle with the remaining shredded cheese and goat cheese. Bake until heated through and cheese is bubbly and melting. About 25 minutes.

I served with sliced avocado, cornbread and a green salad

Chinese Chicken Salad

Chinese Chicken Salad

This is a great, quick meal. I used a bag of salad and angel hair cabbage. This was adapted from Recipetineats.com. I used a package of shredded chicken which added to the easy prep and the cubed frozen ginger which I LOVE. We liked this so much we made it again the next day using just napa cabbage and green leaf lettuce.

Ingredients

Asian Dressing

  • 3 tbsp low sodium soy sauce 
  • 1 tbs balsamic vinegar
  • 3 tbsp rice vinegar
  • 1 tbsp sesame oil (toasted)
  • 2 tbsp canola oil
  • 1 tsp sugar
  • 1 1/2 tsp fresh ginger, grated or very finely chopped (I used 1 frozen cube of the Crush ginger)

Salad

  • 4 cups Chinese cabbage or regular cabbage, finely shredded (I used a package of regular cabbage-angle hair)
  • 1 1/2 cups red cabbage , finely shredded
  • 1 cup carrot, finely shredded
  • 2 cups chicken, shredded

Garnishes

  • 1 cup crunchy noodles
  • 1 – 2 tsp sesame seeds (optional)

Instructions

  • Combine the Dressing ingredients in a bowl and whisk to combine. Set aside for 10 minutes or so for the flavours to meld.
  • Place the Salad ingredients together in a large bowl along with half the crunchy noodles. Drizzle over dressing then toss.
  • Divide between serving bowls. Top with more crunchy noodles and a good sprinkle of sesame seeds. Serve immediately!

Notes

1. Light soy sauce is lighter in colour and flavor than ordinary soy sauce. Ordinary soy sauce is fine to use too. Do not use dark or sweet soy sauce. Sesame oil – use toasted sesame oil.

2. Chinese Cabbage is my favourite in this because it’s softer than other green cabbages. If you use another green cabbage (or all red cabbage), toss salad with dressing WITHOUT noodles, leave for 10 minutes to let cabbage soften slightly. Then proceed with recipe.

3. You can buy crunchy fried noodles in the Asian section of supermarkets. They are cheap – just over $1 for a packet. You can use any crunchy fried noodles. I used Kroger brand.

4. Make ahead: Keep salad, dressing and garnishes separate until ready to serve. Chopped salad keeps for 5 days in an airtight container.

Dressing keeps for 2 to 3 days in fridge, if keeping longer, add ginger before serving. Cooked chicken keeps for 3 days in the fridge – can also be frozen. 

Salmon Curry

Salmon Curry

This was an easy week night meal! It would be great with shrimp or chicken. I think it would even work with tofu if you wanted to make it vegetarian. This was inspired by a blog I like “recipetineats”. It called for some items I did not have in the pantry or could not get (like fresh lemongrass) s oI made it my own with what I had on hand.

Ingredients

  • ▢ 3 salmon fillets
  • ▢ Salt and pepper
  • ▢ 1.5 tbsp oil , separated
  • ▢ 1.5 tsp ginger , finely grated or frozen cubes
  • ▢ 1 tbsp brown sugar
  • ▢ half jar of Trader Joe’s red Curry Sauce
  • ▢ 8 oz coconut milk (I used Low fat)
  • ▢ 1 tbsp soy sauce sauce 
  • ▢ 1.5 tsp lime zest (1 lime)
  • ▢ Lime juice , to taste

Directions

  • Sprinkle both sides of salmon with salt and pepper.
  • Heat 1 tbsp oil in a non stick pan or well seasoned skillet over medium high heat. Add salmon, skin side up, and sear for just 1 1/2 minutes until golden. Turn salmon and cook the other side just for 1 minute, then remove onto a plate (should still be raw inside).
  • Turn heat down to medium low and allow skillet to cool.
  • Heat remaining 1 tbsp oil. Add ginger. Cook until garlic is light golden ~ 1 minute.
  • Add sugar and cook for 20 seconds until it becomes a caramel (see video). Then stir in chilli paste/sauce
  • Add coconut milk and stir, scraping the bottom of the skillet to dissolve any bits stuck on the base into the sauce.
  • Stir in soy sauce, increase heat to medium. Simmer for 2 minutes.
  • Place salmon into the sauce, lower heat and simmer gently for 4 minutes, or until just cooked.
  • Remove salmon, stir in lime zest and juice to taste. Adjust salt to taste with fish sauce.
  • Serve salmon over noodles or rice. .

CHICKEN SATAY WITH PEANUT SAUCE

I put the marinade together at lunch and it made for a quick weeknight dinner. I served over rice with broccoli roasted with olive oil in a foil packet on the grill. Adapted from the blog damndelicious. The sauce would be excellent on its own drizzled over gilled meat or roasted veggies.I warmed up the sauce in the microwave for about 15 seconds before drizzling over the rice and meat.

These are great to keep in the freezer!

INGREDIENTS:

FOR THE MARINADE

  • 1/4 cup coconut milk
  • 2 tablespoons reduced sodium soy sauce
  • 1 1/2 teaspoons turmeric
  • 1 tablespoon freshly grated ginger
  • 1 tablespoon brown sugar
  • 2 pounds boneless, skinless chicken thighs, cut into strips

FOR THE PEANUT SAUCE

  • 3 tablespoons creamy peanut butter
  • 1 tablespoon reduced sodium soy sauce
  • 1 tablespoon freshly squeezed lime juice
  • 2 teaspoons brown sugar
  • 1 teaspoon freshly grated ginger

DIRECTIONS:

  1. To make the peanut sauce, whisk together peanut butter, soy sauce, lime juice, brown sugar, chili garlic sauce and ginger in a small bowl. Whisk in 2-3 tablespoons coconut milk until desired consistency is reached; set aside.
  2. In a medium bowl, combine coconut milk, soy sauce, turmeric, ginger, and brown sugar.
  3. In a gallon size Ziploc bag or large bowl, combine chicken and coconut milk mixture; marinate for at least 2 hours to overnight, turning the bag occasionally.
  4. Drain the chicken from the marinade, discarding the marinade.
  5. Preheat grill to medium high heat. Thread chicken onto skewers. Brush with canola oil.
  6. Add skewers to grill, and cook, turning occasionally, until the chicken is completely cooked through, reaching an internal temperature of 165 degrees F, about 6 minutes each side minutes.
  7. Serve immediately with peanut sauce.

Buttermilk Biscuits

Buttermilk Biscuits

This is so easy to make! Perfect for breakfast with eggs or just drizzled with butter, honey, jam or apple butter! They freeze well. Adapted from Sally’s baking addiction blog.

Ingredients

  • 2 and 1/2 cups all-purpose flour, plus extra for hands and work surface
  • 2 Tablespoons aluminum free baking powder 
  • 1 teaspoon salt
  • 1/2 cup (1 stick) unsalted butter, cubed and very cold
  • 1 cup + 2 Tablespoons cold buttermilk, divided
  • 2 teaspoons honey
  • optional honey butter topping: 2 Tablespoons melted butter mixed with 1 Tablespoon honey

Instructions

  1. Preheat oven to 425°F.
  2. Place the flour, baking powder, and salt together in a large bowl or in a large food processor. Whisk or pulse until combined. Add the cubed butter and cut into the dry ingredients with a pastry cutter or by pulsing several times in the processor. Cut/pulse until coarse crumbs form. If you used a food processor, pour the mixture into a large bowl.
  3. Make a well in the center of the mixture. Pour 1 cup buttermilk and drizzle honey on top. Fold everything together with a large spoon or rubber spatula until it begins to come together. Do not overwork the dough. The dough will be shaggy and crumbly with some wet spots.
  4. Pour the dough and any dough crumbles onto a floured work surface and gently bring together with generously floured hands. The dough will become sticky as you bring it together. Have extra flour nearby and use it often to flour your hands and work surface in this step. Using floured hands or a floured rolling pin, flatten into a 3/4 inch thick rectangle as best you can. Fold one side into the center, then the other side. Turn the dough horizontally. Gently flatten into a 3/4 inch thick rectangle again. Repeat the folding again. Turn the dough horizontally one more time. Gently flatten into a 3/4 inch thick rectangle. Repeat the folding one last time. Flatten into the final 3/4 inch thick rectangle.
  5. Cut into 2.75 or 3-inch circles with a biscuit cutter. (Tip: Do not twist the biscuit cutter when pressing down into the dough– this seals off the edges of the biscuit which prevents them from fully rising.) Re-roll scraps until all the dough is used. You should have about 8-10 biscuits. Arrange in a 10-inch cast iron skillet (see note) or close together on a parchment paper-lined baking sheet. Make sure the biscuits are touching.
  6. Brush the tops with remaining buttermilk. Bake for 15-20 minutes or until tops are golden brown.
  7. Remove from the oven, brush warm tops with optional honey butter, and enjoy warm.
  8. Cover leftovers tightly and store at room temperature or in the refrigerator for up to 5 days.